What is an end trim? Roles and common types of end trims
1.2k viewsAuthor: Đỗ Tuấn Anh7 min read
Share this article:
Article contents
When constructing buildings, a small but extremely important detail that few people notice is the end trim. This is a factor that not only helps to finish joints and edges but also contributes to improving the aesthetics and durability of the project. Have you ever wondered what an end trim is and why it is so important? Let's find out in the article below!
What is an end trim?
End trim is a specialized accessory used at the end of the floor to finish joints or edges in the installation of tile, wood, or vinyl flooring. End trims are usually made from materials such as aluminum, stainless steel, plastic, copper, or wood, with diverse designs, which can be square, round, or curved, depending on the intended use.
End trim, also known as finishing trim or corner trim, depending on the context and location of use. In addition, when referring to trims with specific shapes, end trims are also called F-trim and L-trim to refer to trims shaped like the letters “F” and “L”.
Vinyl flooring end trim
Role of the end trim
If wood or vinyl flooring meets a wall or other surfaces, the end trim is an indispensable element, completing the construction and installation process. Using trims not only enhances the beauty of the floor but also helps to increase the durability and safety of the project. Specifically, end trims have the following roles:
Covering joints and gaps: when installing wood or vinyl flooring, there is usually a small gap between the floor and the wall to allow for expansion. The end trim will completely cover these gaps, creating a seamless and aesthetically pleasing floor surface.
Protecting floor edges: end trims help protect floor edges from abrasion, scratches, impacts, or mold. Trims are especially important in areas with high friction, such as doorways, balcony doors, or where different materials meet. This increases the durability and lifespan of the floor.
Enhancing aesthetics: with diverse designs and colors, end trims also act as decorative accents, making the space more luxurious and professional.
Securing the floor: end trims help secure the floorboards in place where they meet the wall, ensuring the floor does not shift during use.
Trims help protect edges from peeling or damage over time
Most common types of end trims
Based on material and shape, end trims are divided into many different types. Here are some of the most popular types:
1. Plastic trim
Plastic trim is the most popular type today due to its low cost, diverse designs, and colors. Among these, wood flooring plastic trim is the most common, made from high-quality plastic with a wood grain decal surface, bringing a natural and aesthetic look to the space.
Advantages: easy to install, easy to find, low cost.
Disadvantages: not as durable as metal trims, easily deformed when exposed to high temperatures.
Wood flooring end trim
2. Aluminum trim
Aluminum trim has high durability and is termite-resistant, often used in high-humidity areas.
Advantages: durable, good load-bearing capacity, termite-resistant, creates a modern look.
Disadvantages: higher cost than plastic trim.
Aluminum carpet end trim, inox color
3. Stainless steel trim
Stainless steel trim, made from stainless steel, has excellent oxidation resistance and is often used in high-end projects.
Advantages: durable, rust-resistant, creates a luxurious accent.
Disadvantages: the highest cost among all types of trims.
L-shaped stainless steel end trim
4. Copper trim
Copper trim stands out for its good corrosion resistance and offers a classic, luxurious look.
Advantages: high aesthetic value.
Disadvantages: high cost, prone to oxidation if not properly maintained.
U-shaped copper trim
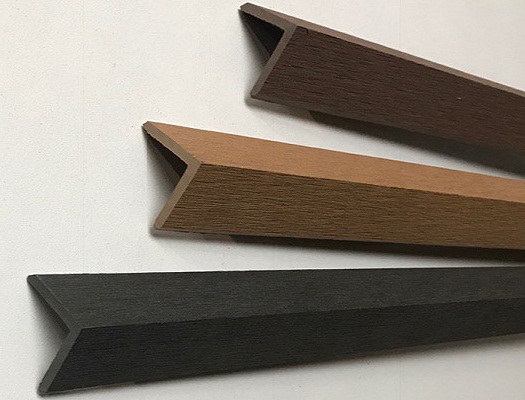
5. Wood trim
Wood trim is often made from the same type of wood as the flooring, creating uniformity in color and wood grain.
Advantages: creates harmony with wood flooring, relatively low cost.
Disadvantages: prone to termites and warping if not properly treated.
V-shaped wood trim
In addition, end trims are also classified by shape, such as:
F-trim: The most common type, used to cover the gap between the floor and the wall.
L-trim: Also used to cover gaps but with a more angular design.
T-trim: Used to join two floorboards at a right angle.
Stair nosing trim: Used for stairs.
F-trim for flooring
>> See more other accessories for installing vinyl and wood flooring
Instructions for installing end trims correctly
Step 1: Measure and mark the trim installation location
Use a tape measure to measure the length of the edges that need trim (floors, walls, joints, etc.).
Use a pencil to mark the points to be cut or the locations for attaching the trim, ensuring the trim fits snugly in the installation area.
Step 2: Cut the trim to size
If the trim is too long, you need to cut it to the appropriate size.
Use a saw or scissors to cut the trim along the marked line, ensuring the trim pieces are cut straight and accurately. At the corners of the trim, especially when connecting trims at right angles (e.g., between two walls or joining parts of the floor), you need to cut the trim at a 45-degree angle to create seamless and aesthetically pleasing joints.
Step 3: Attach the trim to the installation location
Using adhesive: you can use metal adhesive (or metal glue) when installing aluminum or stainless steel trims, or silicone adhesive (for plastic trims) to secure the trim. Apply a thin layer of adhesive to the back of the trim and press it onto the marked location. Ensure the adhesive does not overflow beyond the trim.
Using screws: in case of using screws, you need to drill a few holes in the trim and then screw them into the wall or floor. Be careful not to damage the surface material when drilling.
Installing the end trim: ensure the trim is aligned straight and matches the edges of the material. If it is a corner trim, make sure the corner joint is straight and accurate.
Installing end trim requires meticulousness and specific techniques to ensure aesthetics and durability for the floor
Step 4: Check and adjust
After attaching the trim, check the edges to ensure it is securely and neatly installed. If necessary, you can readjust the trim.
Gently pull the trim to ensure it is firmly attached and not loose.
Step 5: Clean and maintain
Clean the trim: use a soft cloth or dry fabric to wipe away any excess adhesive that may have stuck to the trim surface or surrounding materials.
Periodically check the trim: after a period of use, check the trim's stability and replace it if necessary.
Note: If you need to bend the trim to follow a curved corner of the structure, you can use a heat gun to soften the trim.
Conclusion
End trim is an important part of the finishing process, helping to protect, beautify, and increase the durability of edges of materials such as wood flooring, carpets, or walls. Choosing the right type of end trim not only enhances aesthetic value but also ensures the durability and safety of your living and working space. Consider the material and design of the trim carefully to achieve long-lasting and optimal use.
Thien Ha Floor - a unit specializing in providing cheap and reputable end trims for vinyl and wood flooring.


![PVC Wall and Ceiling Panel Price List [2026]](https://cdn.thienhafloor.vn/2025/08/tam-nhua-op-tuong-pvc-5__w1200.avif)


![PVC Wall and Ceiling Panel Price List [2026]](https://cdn.thienhafloor.vn/2025/08/tam-nhua-op-tuong-pvc-5__w320.avif)
